Showing posts with label insulation. Show all posts

Tuesday, 15 August 2023

Two small insulation jobs

We've make improvements to the efficiency of our home every year that we've lived here. Over time there are of course fewer large jobs left to do, but there's always something that can be improved. While installing solar panels or getting rid of the gas supply are more dramatic, the small jobs also reduce our energy usage and help to make the larger improvements more effective. The same small improvements will reduce energy usage in any home.

Over the last 12 months we've done two small jobs. Both of them were as a result of measuring indoor temperatures on outside walls or doors. The aim of these jobs was to improve the insulation of a small section of our outside wall and the rear door which leads from our kitchen directly into the garden.

Adding cavity wall insulation

We had cavity wall insulation installed in our home in 2008. It was one of the first things that we had done after moving into our new home because we knew from past experience in other homes that it was a very effective type of insulation. Unfortunately, the installers missed a bit: While they were concentrating on the large area of cavity wall at the end of our home, there was a roughly 2 m tall by 0.75 m wide piece of cavity wall on the other side of our living room next to our front door which they didn't treat at all. Measuring the temperature of the inner wall in winter revealed it to be easily the coldest spot in our living room. As a result some condensation occurred there and there was sometimes a little mildew to wipe away. I asked many companies to come and do this small job, but none of them were interested. They'd either just say no, or they would quote the same price as for a whole house,  which is not only ridiculous for a half hour job that they could have done at the end of a working day, but also not cost effective. So this had to be a DIY job and I finally got around to doing it in September 2022.

Obviously I don't have access to a professional machine which can inject insulation at high pressure so I would need the holes to be closer together. I decided to use expanding polyurethane insulation. To begin I drilled a couple of holes just a few cm apart to see if the foam was expanding sideways in the cavity and when this was confirmed I started drilling holes about 15 cm apart in a zip-zag pattern. It took about three hole cans of polyurethane foam to do the job. Much cheaper than the quotes I'd received. The holes were filled with mortar and there's now no sign at all that that was done to the wall.

The two holes near the centre were the first test holes. I then drilled holes in a zig-zag pattern up the wall and squirted in insulation until it was visible in the next hole along.

During winter 2022/2023 I could measure an obvious change. The interior wall was no longer cold, but actually slightly warmer than the opposite wall with the professionally applied insulation. We no longer have a condensation problem anywhere in our living room. So this is a definitely improvement. I can't say how much heating energy it saves as that's almost impossible to measure, but it will mean that we require at least a little less heating.

Insulating the back door

The wooden panel under the window in the back door from our kitchen to the garage is the coldest spot in the whole house. As a result it attracts a lot of condensation in the winter and has to be kept clean, and we also lose quite a lot of heat through it even though it's a relatively small area. The door was on the list of things that I intended to replace, but when I came to look for a more efficient replacement I couldn't find one. No-one seems to sell doors like this with insulation inside them. There are plenty of front doors with insulation, but the back door options all have glass right down to floor level, which is not an advantage for us with dogs which will respond to birds or (worse) cats in the back garden. So I decided instead to try to insulate the door that we already have. It's the least expensive and the least disruptive way of insulating our back door.

For this job I made wooden boxes of nearly the width and height of the wooden panel on the door, one to install inside and the other outside. The outer shell of each box is 3 mm thick marine grade plywood while I used 1 cm square wood to make the box form.

Boxes under construction. Marine ply, one cm square section wood and wood glue.

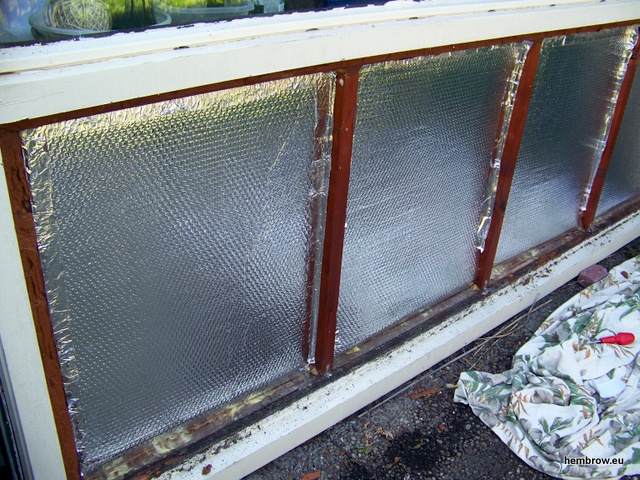
Each box is filled with two layers of aluminized bubble-wrap material. This is not the best insulating material, but I could fit two layers in each box, so there are four layers in total. I also wanted to use a material which would form a moisture barrier and which should reflect some heat.

Two layers of aluminized bubble-wrap type material fit inside each of the boxes. That's four layers in total either side of the existing wooden door. Opinions seem to vary widely about how good an insulating material this is, but four layers of it will of course work better than one. In this case it was selected because it's clean to work with and I'll be able to easily remove these panels from the door if they turn out to be a problem for some reason.

Each panel is nailed in place, with a layer of sealant between the box and the existing door.

Plenty of nails to make sure that the sealant really does seal. I don't want moisture getting inside.

After fitting the inner and outer panels they were both painted to match the door.

Before and after. The existing door was not in perfect shape, but most of the damage is now under the new panel so it should be more resistant to the weather than it was before. We will see.

So now I wait to see how well this works. In the summer when the door is in full sun I've been able to measure a 10 C difference in temperature on the inside of the door between the outer part of the door not covered by the new panels and the inner part of the door which is covered so it must already be helping to reduce the temperature of our home during the summer months. I'll make measurements during winter and add them here.

I wouldn't have done this to a new door, but our door was showing its age already so I'm hoping this will extend its useful life. While there is no rotten wood (there was some on the inside but I fixed that problem several years ago) there were gaps between the panels into which rain could penetrate. I'm hoping that the new outdoor panel will stop this from occurring, but of course if rain gets inside the panel that could create a problem. It's an experiment.

As with the cavity insulation job, I don't think it will ever be possible to measure exactly how much energy is saved by insulating this door, but it should mean that we need a little less heat next winter. As the next job is to change the way we heat our home, this will be important.


A previous blog post covered other small insulation jobs.


Monday, 17 December 2018

Upgrading Windows to version 3 (Continuing to insulate our home with triple glazing)

Our windows were fitted by Van Dijk Services
Assen. They did a good job so deserve a link.
We knew we'd have to do something about the insulation of our home in Assen before we even moved in and every year we've made some change to improve the energy efficiency of our home. One of the oddities of 1970s Dutch homes is that while they had double glazing on the main rooms on the ground floor, it was quite common to have single glazing in places like the hall and all of the bedrooms upstairs. We fixed that problem eight years ago by installing HR++ double glazing to replace all the single glass and this was very effective. But we kept the same older windows downstairs.

It took a while for us to get around to considering the downstairs windows because we were busy with insulating the floor, the roof, the walls, installing solar panels on the roof, our bicycle parts business, and generally getting on with life, but we've now begun. In fact, we did one of the smaller panes last year because the old double glazing had developed a leak and we took this as an opportunity to experiment with triple glazing. We made measurements and found that it was effective. When the outside temperature was -2 C and the inside temperature 17.5 C the temperature of the inside of a double glazed pane was measured as 9 C while the inside of the triple glazed window alongside it measured 14 C. Clearly we could stay warmer with less heating if we replaced more of the old double glazing downstairs in our home with triple glazing.

Thus far we've replaced the glass only on the front of our home. We're still not entirely sure what we'll do on the back of house, but there is less than half the area of double glazing in the living room on the back compared with the front.

One of the old panes being removed

The replacement coming into place. It took some lifting because it weighed 127 kg.

Fixing into place

Just fitted, not made neat and tidy yet.

A tidy job completed. We now have to wait a couple of days before we can clean the glass because the sealant has to dry first.
Travel less, nor more, insulate your home
and don't eat meat
.
We hope this will reduce our gas consumption and our heating bill. We already have a very low energy bill because we generate more electricity than we use. The gas bill, which covers cooking and water heating as well as heating, is also low and has reduced each year. Dutch bills are increasing quite sharply this year due to increased tax on gas, but our estimate for next year is the same as this year, and the energy company doesn't know that we've taken measures which hopefully will reduce our usage further.

It's becoming more and more obvious to us that we can't continue to increase our energy usage but must decrease it. We must decrease our burning of fossil fuels. There is little time left to do this. The IPCC report from the 8th of October told us that emissions need to be reduced to zero in 12 years time. Who is doing enough to make that happen ?

Because of our concerns we are not only continuing to make our home more efficient but have also got rid of our car and stopped our business of offering holidays and study tours. Encouraging people to make international journeys to cycle is just not of this time. We must all stop behaving as if we can do whatever we like without consequences. Our children and our grandchildren, not to mention millions of people in poorer countries, are being made to pay for our own selfishness.

Yesterday afternoon. Four identical houses, ours is on the left. We're winning the race to keep ice on the roof from melting. Luckily it was somewhat warmer today.
January Update: Is it effective ?
We will really only know how effective the triple glazing is after the bills come in and we see if we've used less heating. However it's -4 C in the garden today, the sun is still on the side of the house and the inside of the double glazing at the back measure 8.7 C while the inside of the triple glazing at the front measure 14.5 C. Obviously we are loosing a lot more heat through the double glazed panel than through the single glazed panel.

Ice crystals visible on the outside of a triple glazed window when the temperature is -9 C outside. Photographed from the warmth inside.
There's also a very visible difference in that ice crystals form on the outside the triple glazed panel, proving the temperature there stays below freezing while we have a more liveable temperature inside the house. This never happens with our double glazed windows. In fact the closest thing that I have seen to this in the past was when we had ice all over the inside of the upstairs windows of our house before we replaced the single glazed panels there with double glazing. That wasn't comfortable at all !

Update February 2019 - it's working !
The front of our home, with the living room, is now fully triple glazed while the rear with the dining area (open to the living room) and kitchen remain double glazed. There's now an obvious difference in temperature between the front and the rear which I can also measure. Seeing this graph in February 2019 led me to make a simple calculation of consumption of gas for heating:

Source: Martien Visser.
I keep a spreadsheet of our monthly gas and electric consumption. We used less gas in January 2019 than any other January on record, even the somewhat colder 2017. Our gas consumption in January 2019 was 15% lower than the same month in 2016 when the temperature was very similar. A drop in gas consumption of 15% represents a greater than 15% drop in use of energy for heating because we also use gas for water heating and for cooking.

I only have one month of data so far so have to be cautious, but it appears that the replacement of the front windows with triple glazed panels has been effective. At this rate the windows will have paid for themselves in terms of nothing but a reduced heating bill within ten years even if there is no increase in the price of gas. That's a good rate of return and if it's possible I will replace the rear downstairs windows with triple glazing later this year.

Update November 2019
We've just had the rear windows upgraded to triple glazing.

This time the work was done by D & S Glasmontage, a different local company from the one who did the front windows, but known to us already because they installed new windows for us upstairs many years ago.
So now we're completely triple glazed downstairs except for the window in the back door of the kitchen.

Wednesday, 13 December 2017

More insulation for our walls and roof

When we first moved into our home in Assen we were disappointed by the lack of insulation resulting in a high energy bill even with low indoor temperatures during our first winter.

We have now lived here for more than ten years. Each year we've done something which has improved the energy efficiency of our home, including this year when we inexpensively added more insulation to the top floor of our home. The result is that this winter our home is again a little warmer and also more energy efficient so more economical than it was before.

Two days of snow followed by warmer weather and rain and
we still have solid snow on our roof. The area under the red
square is where we made the most recent change. The area to
the left of the red square is a bedroom which we had already
insulated in a similar way a few years ago.
The roof
This year's improvement was quite minor: We added insulation to the ceiling above the top floor landing and staircase. This results in the first floor landing and ground floor entrance hall being better insulated than they were before. This job actually began in the first winter that we lived here when I quickly added some thin insulation panels to this area after seeing our first winter fuel bill. It continued a few years later when I doubled the thickness of that insulation but then remained as an unfinished job until the beginning of this year when we began the last part of it, stretched out over months because of other commitments, beginning by adding yet more insulation to reach a total thickness of about 10 cm, covering this with reflective and damp proof foil and finally hiding that with plasterboard (aka gipsplaten, gypsum board, sheetrock), sealant to fill the gaps and applying some paint. Actually, the job is still not quite finished. I need to paint again.

Anyway the process was simple and can be summed up in one photo:
10 cm of solid insulation above double sided bubble wrap foil which itself offers quite good insulation and reflects back energy otherwise lost due to radiation. Gaps in the foil are closed by reflective tape where there are joins. Wooden battens are installed to support the weight of the plasterboard sheets. It's quite important that there is an airtight seal as this prevents condensation from forming behind the insulation where it is cooler.
Also the walls
It's been five years since I last wrote about insulating our home but that's not five years of doing nothing. Another job which was completed a couple of years ago was taking apart the lower parts of the front and back walls on the ground floor of our home. I had long suspected that there was not much insulation inside these walls, and was pleasantly surprised to find that they were better constructed than I had expected. In total there was 4 cm of glass wool plus another 3 cm of polystyrene solid insulation bonded to an asbestos sheet which provides weather protection on the outside of the house to a height of about half a metre (we don't have any other asbestos so far as I know, except a fireproof panel on the door to the room with the central heating).

The existing fibreglass looked a bit sad, clearly it had been damp at some time, though there was no sign of any damage to the wood, all of which looks brand-new from the inside despite being 40 years old. The insulation was not very evenly distributed. I removed it and it was possible to see some gaps through which air could come from inside the house, the probably source of the damp which had discoloured the fibreglass. I sealed the gaps and all around the edges so that the wall is now both air and water tight and no further damage should be possible.

I then used the same double sided reflective bubble plastic here. It's the same double sided bubble wrap type foil as I later used in the ceilings upstairs. In this instance you can see it installed on the inside edge. On top of this I installed the existing fibreglass a bit more evenly than before. It had been discoloured but there was nothing wrong with it. On top of that there is now then another layer of reflective foil which helps to reflect out sunlight in the summer. There is a radiator mounted on the other side of this wall. The interior reflective material is intended to help to keep radiated heat inside the house.

Afterwards I re-installed the original polystyrene + asbestos outside panels, slightly further out than before because the thickness of the reflective foil has added slightly to the overall thickness of the wall. The asbestos is something I intend to dispose of in due course, but covered in paint and on the outside of the house it's not really a danger so for now it will remain until we think of a better alternative. Note the paintwork behind - one of the other problems with these sheets is that paint other than the original brown of the house seems to peel of its own accord. This has been repainted and now looks a lot better again.
Low cost improvements
Neither of these jobs cost much to do. The results of them are difficult to quantify, but thicker insulation and reflective materials to keep infra red energy within the house ought to be expected to bring improvements. We notice that even on cold nights the wall behind the radiator now feels warm rather than feeling cold so it seems that the reflection within the wall is helping. Even more obvious is that we keep snow or frost on our roof a lot longer than any of our neighbours do. Our immediate neighbour's home, featured in some of our photos because it's closest by, is far from the worst in this regard.

Neither of these two jobs was expensive to do. The materials (reflective foil, insulation, tape, sealant, glue, screws) are cheap. It required a bit of planning and took quite a few hours, but it's a reasonable DIY job.

A less inexpensive job
Last year we also had a problem with one of our windows. The seal had broken on an older double glazed unit in our front room, dating from the 1970s, and we arranged for this to be replaced by a new triple glazed unit:

The old glass looked misted up all the time because moisture was caught between the two panes. This is not a rainy day photo even though it looks like one.

The new triple-glazed HR++ panel before installation. It only covers a small percentage of our total glass area but at least this small percentage will perform far better than before.
With windows, the glass isn't the most expensive thing. Labour for fitting this new glass cost more than the glass itself. However this was not a job which I could have done myself as the glass was heavy and needed to be lifted quite high (it's the longest window at the top in our living room in the photos. This more expensive job simply couldn't be done by myself but we did need to replace the panel anyway so decided to pay the small extra cost for triple glazing over double glazing. Our thinking was this while this won't make a huge difference to our energy consumption nor even to our comfort (getting rid of the misty glass it's more of a cosmetic difference), it will at least make a small positive improvement. I estimate that the downstairs will leak energy about 5% less than before.

Measurements made with an infra-red thermometer show that when the outside temperature is -2 C and the inside temperature of our home is 17.5 C, the inside of the older double glazed panel is 9 C while the inside of the new triple glazed panel alongside is 14 C. Clearly heat loss with be much smaller through the triple glazed panel.

Our current plan is to replace other double glazed units with triple glazing as they fail. When we bought our home there was single glazing upstairs but we had that replaced some years ago.

Better insulation = a more pleasant home
Better insulation means a more comfortable home, less energy consumption, a lower carbon footprint, and lower bills. What's not to like about any of that ? Many effective treatments can be made

A white roof is an energy efficient roof ! This photo was taken later the same day as the photo at the top, after a little rain and slightly higher outside temperatures. All four homes originally had identical insulation but our home, the left-most of the four, benefits in quite an obvious way from the extra insulation we've added.

Monday, 15 October 2012

Insulating the floor

Since we've lived here, we've fitted HR++ double glazing to the previously single glazed upstairs windows and installed cavity wall insulation in the one wall where this possible. We're also generating our own electricity these days with solar panels on the roof. However, our quest to reduce our energy consumption is not finished yet. One of the first things we did when we moved here was to insulate the roof a little better, but that needs more to be done. Before this winter, though, we decided that we would prioritize insulating the floor.

It may seem counter-intuitive to bother with the floor at all. A normal rule of thumb is that only about 10% of heat loss from a home is through the floor, with the walls taking about 50% and the roof 40%. This would make it seem that insulating the floor is barely worthwhile. However, most of the effect of the extra insulation which we've installed over the last few years has been felt upstairs. We don't need our bedrooms to be so warm as the living room, but for the last two winters we have found that when we go downstairs on a cold morning, we go from relatively warm rooms upstairs to a relatively cold room when we get to the living / dining room. The conclusion to draw is obvious: while effective, our insulation efforts thus far have been a bit unbalanced, favouring the upstairs, and we now need more effective insulation of our ground floor.

As luck would have it, as we started to think seriously of installing floor insulation a leaflet came through our door which said that the local council would pay for energy advice and an energy performance report for our home (we had these in the UK as well and I'll write more about this later). A few days later Wietse Hiemstra, a very helpful friendly adviser from Real Advies, came to our home and made calculations about all the potential energy losses from our home. These confirmed that by far the greatest potential energy loss from our downstairs rooms was now through the floor. This is so because not only was it not insulated at all, apart from the effect of the carpet, but also because the floor exposes a greater area to the outside cold than anything else on the ground floor

We have a concrete floor with "kruipruimte" underneath. This is a space about 60 cm high through which you can crawl. It's not a cellar. The three options available to insulate this space were to have an 8 cm layer of polyurethane insulation sprayed upwards onto the bottom of the floor, a vast quantity of polystyrene packing pellets poured in to make a 30 cm deep pool at the bottom of the cavity, or pockets of reflective silvered plastic foil could be suspended underneath the floor ("space blanket" material) to reflect heat back into the house.

Initially, I was least enthusiastic about the polyurethane. This was not due to any concern about its effectiveness as polyurethane foam is clearly a very effective form of insulation, but that I didn't much like the idea of the house being made smelly for a long period of time due to the chemical reaction. However, when we considered all the pros and cons, this eventually came to the top of the list.

The silvered plastic foil seemed attractive in that it has the reported lowest cost to the environment. However, while the manufacturer is very enthusiastic about it, I couldn't find any independent verification of its efficacy. I also wasn't sure that I entirely trusted it to stay attached to the bottom of our floor. If we were to look under the house in a couple of years time and see that it had fallen to the bottom of the kruipruimte, then our expensive insulation would have effectively completely disappeared. Perhaps this never happens. However, I couldn't find independent verification. This was also the most expensive of the three options, and therefore would take the longest to pay back in reduced heating costs.

The plastic pellets were the cheapest option. However, this sounded like it would be a real bundle of laughs if there was ever plumbing work needed underneath the house. Our water supply and drainage both run down there. Therefore I rejected this on these grounds.

That left the polyurethane. This would also stick around pipes and wires, but to do work you'd just have to cut away the part of the insulation which was awkward. That left the problem of smells. The suppliers assured us that the smell goes after a couple of days. We decided to take the risk and the work was done on Saturday.

Installers from Van Den Berg Isolatie. There are four pipes, two supply the two part PU insulation, one provides air for expanding the insulation and the last provides air to breath.
Into the kruipruimte.
At first the smell was overpowering and unpleasant. We expected this from the beginning, and we ate our evening meal in a restaurant on Saturday. When we went out we left the door closed between the living room and the hallway and the windows in the living room open, and there was very little smell in either our living room or bedroom.
Spraying in progress. The washed out look of the photo is due to the acrid fumes which filled the underfloor space while this went on. An air supply for the guy doing the job was clearly essential.
As I write this, it's just over 40 hours after the installation was completed, and there is very nearly no smell in the house at all unless I open the hatch to let the fumes out (with windows open to disperse it), and even then the smell is tolerable.
Before

After

Before

After
Our initial feelings are good. The floor feels warmer. I've been wearing slippers in the living room for a few days now due to autumn being a bit cooler, but found that my feet were too hot last night so I took them off. I think this is a good sign.

Now we wait and see if this makes a noticeable difference to our heating bill over winter.

Tuesday, 19 October 2010

New glass

One of the oddities of our home in the Netherlands is that while the ground floor was almost entirely double-glazed, the first floor was not. This was apparently the building standard of the time it was built - 1972.

The windows are large in our house, so they're more important than they might be in a house with smaller windows. However, the rooms without double glazing are those upstairs which we don't really need to keep particularly warm.

For some time we've been weighing up the pros and cons of spending money on glazing for rooms which don't necessarily need to be kept at a particularly high temperature, and eventually made the decision to go ahead with the work.

We were influenced more than a little by a study about the effectiveness of HR++ glazing which gives some figures suggesting that the HR++ glass is particularly effective. Also, the cost was more reasonable than expected (the second company we asked have a quote which was less than half that of the first), and as it was possible to replace the glass within the same hardwood window frames and not have to replace the frames as well (we're not huge fans of PVC windows), we decided it was a good idea.

We don't expect it to make the same big difference to our heating bill as cavity wall insulation did, as the thermostat in the house is downstairs and relatively unaffected by the temperature upstairs. However, it will presumably mean the entire house is better insulated so have some effect on the ground floor as well, and of course it also means the end of condensation on the bedroom windows, which froze on the insides in the winter and made it difficult to open the windows.

Yesterday it happened. New glass in the first floor windows.

We're hoping this makes conditions a little more pleasant for our teenage daughter in the front bedroom, which due to receiving least sunlight was the coldest room in the house in the winter.

So far, our heating bills have been lower each successive winter since we've lived here, as each time the house is a little better insulated than the previous winter. It's a pattern I'd like to continue.

Friday, 13 February 2009

Cavity wall insulation effectiveness

Last year we had cavity wall insulation installed. This is the third house we have done this with, and for the third time it has been extremely effective at reducing the heating bill.

January 2008 had an average morning temperature (my measurement taken at whatever time in the early morning that I happen to have looked) of around 5 C. This winter has been the coldest for over a decade and the average temperature taken in the same way in January this year was -0.5 C. Despite this, the gas used was 281 cubic metres this January vs. 274 last January.

I didn't write down the temperatures for December 2007, but remember that the lowest temperature I cycled in was -6 C vs. -11 C this winter. However, our gas consumption was 396 m^2 in December 2007 vs. 298 m^2 in December 2008.

Overall this seems to have been a very effective measure once again. It looks like even though it cost us around 700 Euros to have the insulation installed, it will pay us back in about three years. It's much cheaper to have cavity insulation installed in the UK, so the payback period is even shorter there.

We still have more to do here to get the heating bill as low as we'd like, though.

On the right, another photo of the frozen canal taken yesterday. It snowed a little. The snow was quickly cleared from the cycle path, but rested on top of the frozen canal. I wonder how much insulation the house boats have.

Further updates
Since this blog post we've installed far more insulation and our use of energy for heating is much reduced as a result, along with the cost of energy.

Sunday, 7 December 2008

Four roofs

Four identical houses in a row. Ours is the house on the left, where least of the ice has been melted by our heating, therefore showing that the insulation I've installed in the roof is working well (or perhaps that we've got our thermostat set lower).

We haven't really done much in the way of loft insulation yet, it's a start and we will add more.

I covered our cavity wall insulation a few months back.

In 2017 we added more insulation to the roof and there's now a more impressive photo showing the roofs.

Monday, 18 August 2008

Saving Energy - insulation and measuring electricity usage

Time for a change from the cycling topics. Our energy bills here seem to have been somewhat higher than before we moved. This was especially true in winter, so we had cavity wall insulation installed in our house today.

It was extremely effective in two of our previous homes and we're hoping for the same savings on the heating bills here.

Cavity wall insulation typically pays for itself in about 3-5 years. Perhaps even quicker if the price of fuel increases. While loft and floor insulation are DIYable, cavity wall insulation isn't.

We've also started measuring the electricity consumption of some of our appliances. To do this we bought the "power calculator" pictured on the right. This purchase was prompted by a recent visitor who commented that our firewall PC would cost more to run for a year than a cheap off the shelf replacement would cost to buy.

Our firewall is actually quite frugal. It's built around a half length ISA embedded 486SLC card on a passive backplane in an old 286 case with 60W power supply. It runs freesco, a tiny linux distribution, and consumes only around 20W. This adds up to about 8 cents of electricity per day for the 16 hours or so that it's usually switched on - around €29 per year. We could buy a replacement box for €20, so our guest is right. The consumption of the plugin appliance style firewall ought to be no more than half this amount, so it would pay for itself in about 18 months which is worthwhile.

I then went on to other things. It turns out that the firewall is a relatively small user of energy. The PC on which I'm typing this (a 1GHz Athlon based machine dating from 2001 - someone else's cast off but fast enough for us because we use Linux) gets through 100W on its own, and the 17" monitor another 55W. It amounts to about 35 cents per day or over €120 of electricity a year. That's nearly a sixth of our entire year's electricity bill !

As a result, I'm also looking into ways of reducing this monster's consumption. A laptop might consume less, but the cost of them makes it unlikely that they'd pay for themselves ever. The same seems to be true for ITX and other smaller form factor PCs.

Replacing the CRT monitor with an LCD of a similar size would probably not help a lot as while it would reduce consumption by 15-20 W when it's on (they typically seem to be quoted as consuming 40W), it would add 5W or so of consumption when it's off. Our current monitor has a proper off switch so consumes nothing when its off. What I have done is to make sure the auto-power off feature of the computer is enabled. If we leave it on and walk away, the monitor goes into low power mode after 10 minutes and the computer goes into standby after an hour.

Read further posts about energy conservation on my other blog.

Update
This being a post from 2008, some parts of it are outdated. We no longer run the same firewall nor any CRT monitors. The argument which I made then still makes sense, but the availability of extremely inexpensive second hand LCD monitors made the CRTs no longer make sense even on the basis that I wrote about above. What's more, I now also have a switch installed to completely disconnect the computer from the electricity network when its not in use. That made a drastic improvement.